Sides

Holiday Stuffing

Whether you call it stuffing or dressing, cook it inside or outside the turkey, this is one of those “must-have” traditional dishes to serve on holidays like Thanksgiving or Christmas.

Even though I’m sharing recipes that are lower in starchy carbs on this blog, I thought that I could add one holiday “treat” that has been popular in my family over the years.

I’m a firm believer in following the 80/20 rule for healthy eating. If you eat healthy, nutritious, minimally processed and lower-carb foods 80% of the time, then you can have a few higher carb treats now and then. If you eat a bit of stuffing, or pie, or your mom’s famous cookies, don’t beat yourself up. Just enjoy it and try to limit the treats to the actual holiday, and maybe a day or two afterward. This way, you won’t be overeating for an entire month!

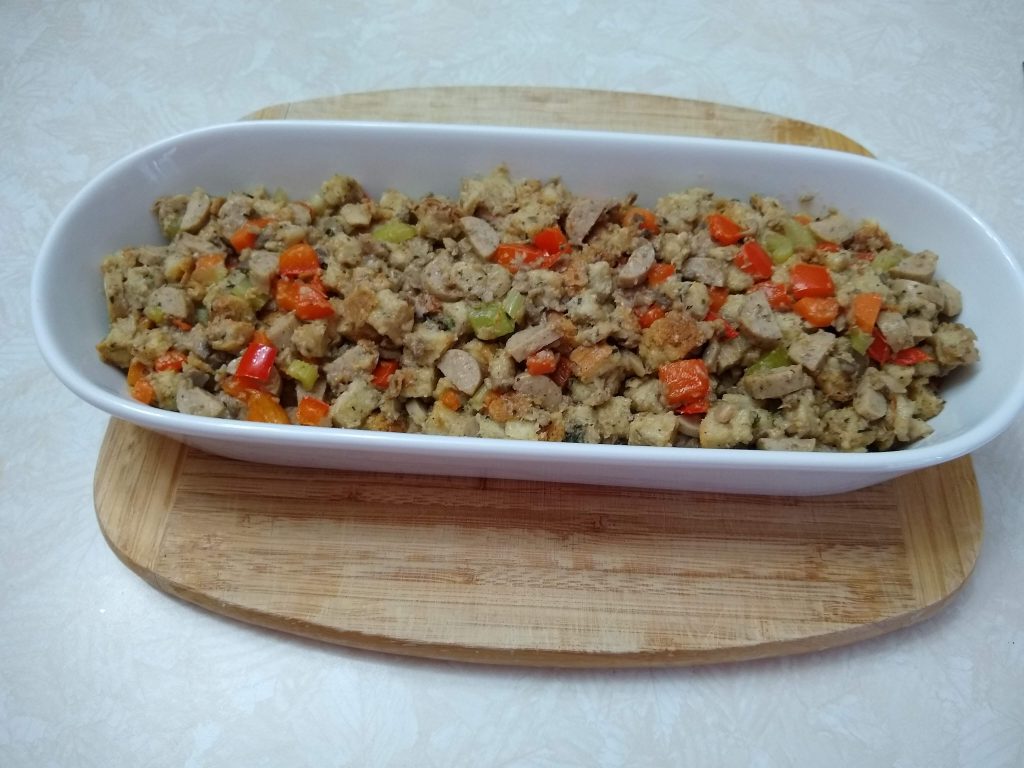
Back to the stuffing…even people who don’t normally care for it tend to like my recipe. It’s not just a bunch of bread with a bit of sage and turkey flavoring, but it’s loaded with juicy, delicious sausage and tons of fresh vegetables and herbs. The small dash of cayenne pepper really gives it a nice kick!

Many people add celery and onions to their stuffing, but this recipe also includes mushrooms, carrots and red peppers.

In my opinion, the breakfast sausage really enhances the flavor, and also gives a bit of a spicy kick. Years ago, I would just add any pork sausage that was on sale, but now I like to use healthier meats like chicken and turkey, preferable nitrate-free and organic.

For the convenience, I like to use the packaged stuffing mix, but feel free to use fresh bread cubes that you’ve dried in the oven.

To begin, melt butter in a large skillet, then add the diced vegetables.

You can see how colorful it looks! Continue cooking for several minutes until everything is soft.

Then add the sausage. In this case, the sausage is precooked, so you can immediately add the rest of the ingredients. But if you use raw ground turkey sausage, be sure to break it up into small pieces and cook thoroughly before proceeding.

Next, I like to add a bunch of herbs and spices to really liven it up. Even though the stuffing mix has herbs, I still add basil, oregano, rosemary, thyme, sage, black pepper, as well as a bit of cayenne pepper. Then add the stuffing mix or bread cubes and chicken broth.

Mix it thoroughly to see if it’s moist enough, and add a bit more water or broth, if necessary. Taste to see if it needs a bit of salt.

Place the mixture in a large, oiled baking dish. Cover and bake at 350 degrees for about 30 minutes, until hot. If you want to brown the top slightly, remove the cover for the last 10 minutes.

I usually make the stuffing a day ahead and refrigerate. In that case, plan to bake it for about 40 minutes. I hope that you enjoy this recipe as much as my family does!

Holiday Stuffing

Servings:  12

  • 1/4 cup organic butter
  • 1 large onion, peeled and diced
  • 8 ounces fresh mushrooms, minced
  • 2-3 stalks celery, diced
  • 2 carrots, diced
  • 1 red bell pepper, seeded and diced
  • 1/2 teaspoon dried basil
  • 1/2 teaspoon dried oregano
  • 1/2 teaspoon dried thyme
  • 1/2 teaspoon dried rosemary
  • 1/2 teaspoon dried sage
  • 1/4 teaspoon black pepper
  • 1/4 teaspoon salt, or to taste
  • 1/8 – 1/4 teaspoon cayenne pepper, optional
  • 1 pound nitrate-free chicken or turkey breakfast sausage, ground or diced
  • 1 12-ounce package Pepperidge Farm Herb-Seasoned Stuffing Mix
  • 2 cups low sodium chicken stock

Directions:

In a large skillet, heat the butter over medium heat.  Add the onions, mushrooms, celery, carrots and red pepper, and saute for several minutes, until tender.  Add the spices and breakfast sausage.  (If the sausage is uncooked, continue heating until cooked through.)  

Add the stuffing mix and chicken stock and stir until everything is combined, and the stuffing is moist.  Add a bit more broth or water if it seems too dry.

Pour the stuffing into a large casserole dish, cover and bake in a preheated 350 degree oven for 30 minutes, removing cover for the last 10 minutes.

If making ahead, refrigerate stuffing, then bake covered for 40 minutes when ready to serve.

Cucumbers in Sour Cream

This recipe was provided by my Polish mother-in-law. Note that her version doesn’t include scallions, but I thought they made a nice garnish.

The salad is delicious…creamy, refreshing and slightly tart, with the main enhancement of fresh dill.

The key to this recipe is to slice the cucumbers very thinly, salt them, and let them stand for a half hour so that the water starts to come out. You don’t want a watery salad! I was lucky enough to have a cucumber from a friend’s garden. It had a lot of large seeds, so I just scooped them out with a spoon before slicing.

Next, after a half hour has passed, place the colander over the sink and take handfuls of cucumbers and squeeze them well, until they expel as much liquid as possible. Place the squeezed cucumbers into a bowl.

Then just add your sour cream, a bit of lemon juice, black pepper and fresh dill weed. You can adjust the seasonings as you like, adding a bit more salt or lemon juice, or a tiny pinch of sugar.

The salad can be served as a side dish with any meats, fish, poultry, or sandwiches.

Cucumbers in Sour Cream

Servings:  2

  • 1 medium cucumber, peeled and seeded
  • Salt, to taste
  • 2 tablespoons organic sour cream
  • 1-2 teaspoons fresh lemon juice
  • 2 teaspoons fresh dill weed, minced
  • Black pepper, to taste
  • 1 tablespoon sliced scallion greens, optional

Directions:

Slice the cucumber very thinly and place in a colander.  Add a generous sprinkle of salt and toss.  Let sit at room temperature for 30 minutes.

With your hands, squeeze out as much water as possible from the cucumbers, and place them in a bowl.

Add sour cream, lemon juice, dill and black pepper and toss to combine.  Taste to see if more salt is needed.  Garnish with scallions.

It’s best to make the salad at least 1 hour ahead so the flavors have time to develop.

Simply Roasted Cauliflower

All vegetables taste better roasted. They become sweet and caramelized, with a bit of charred flavor, just like you get from grilling. The most difficult step is washing and chopping, then you can just throw them in the oven and let the magic happen.

Cauliflower is so versatile, you can add many different spices to vary the recipe, depending on what you have a taste for. Are you serving it alongside Chicken Parmesan? Then add some oregano, basil and a touch of garlic powder.

Maybe you’re looking to spice it up with chili powder, cumin and cayenne pepper?

Do you want a rich, slightly decadent side dish? Drizzle on a bit of melted garlic butter.

And if plain cauliflower doesn’t do it for you, add other vegetables like onions, peppers, broccoli or mushrooms. You just want to choose those that take the same amount of time to cook. (For example, you wouldn’t add chopped asparagus, because that cooks much more quickly.)

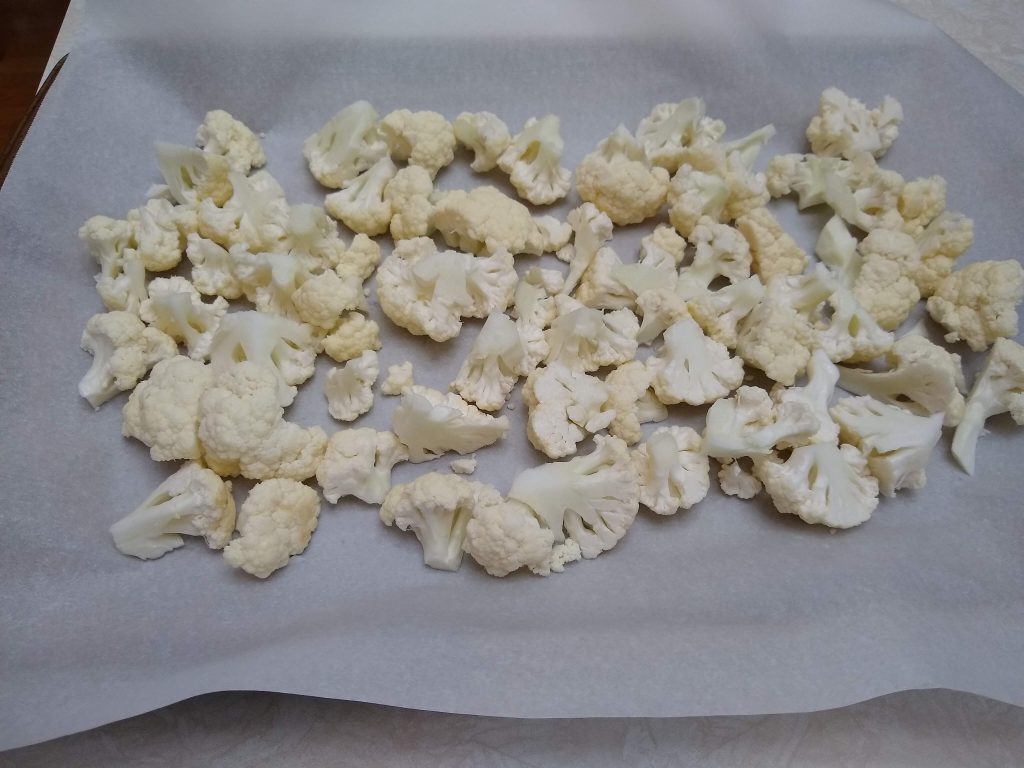
So here are the steps for the most basic version. First, chop the cauliflower into bite-size florets and place them on a baking pan covered with parchment paper.

Next, drizzle on avocado oil, salt and pepper, and mix thoroughly. I used pink Himalayan salt.

Place the pan into the oven at 425 degrees. It’s important to stir the cauliflower halfway through cooking (or at about 15 minutes), so it doesn’t get burned. Then put it back in for another 10 minutes, and it’s ready! Slightly browned in spots, but tender and delicious.

Simply Roasted Cauliflower

Servings:  4

  • 1 large head of cauliflower
  • 2 tablespoons avocado oil (or olive oil)
  • 1/4 teaspoon sea salt
  • 1/4 teaspoon freshly ground black pepper

Directions:

Preheat the oven to 425 degrees.  Place a piece of parchment paper on a large sheet pan. 

Slice the cauliflower in half, then in quarters.  Slice diagonally at the base of each quarter to remove the tough core and leaves and discard.  Then chop the cauliflower into small florets, and place them on the sheet pan.

Drizzle with oil, salt and pepper and toss to distribute evenly.

Roast for 15 minutes, then stir to prevent too much browning on one side.  Continue roasting for another 10 minutes.

Variations:  There are so many things you can do with cauliflower!  You can add different spices, such as rosemary, oregano or basil, or make it spicy with curry powder, cumin or cayenne.

Add large pieces of raw onion to the cauliflower before roasting, which become sweet and caramelized.  Or toss in any other vegetables, such as bell peppers or mushrooms.

For an even richer treat, melt a bit of butter with minced fresh garlic and drizzle it over the roasted cauliflower as it comes out of the oven.  Then sprinkle on minced parsley or chives.

Asian Fried (Cauliflower) Rice

Growing up, my family loved to order Chinese takeout, as I’m sure many of you did (or still do). I remember having egg foo young, chop suey, and of course, fried rice. It was delicious and satisfying, with the little bits of egg, onions, peas and the salty tang from the soy sauce.

Fried rice is one of those dishes that many people give up when trying to eat healthier, low-carb meals. I know that for a time, I would only eat plain steamed rice to avoid excess fat. Now that we know fat is not the enemy, but instead excess starchy carbs, I realized that I can enjoy all the flavors of traditional fried rice, by just substituting riced cauliflower for regular rice.

I actually started making this for breakfast, since it’s a nice alternative to an omelet or traditional scrambled eggs. And I don’t always use riced cauliflower, but leftover cabbage, eggs and whatever vegetables I have on hand.

The key to getting the delicious Asian flavors is very simple: soy sauce (or coconut aminos), toasted sesame oil, and a bit of Sriracha hot sauce. Of course you can add other spices such as ginger and garlic, but it’s still very tasty with just the bare minimum of seasonings.

Feel free to experiment and add what you like. It’s a great way to use up leftovers! You can add meats, chicken, shrimp, spinach, broccoli, water chestnuts, sugar snap peas, etc.

Here are the ingredients I had on hand for today’s recipe: frozen riced cauliflower, eggs, green cabbage, frozen peas, carrots and green onions, as well as the soy sauce, sesame oil and Sriracha.

I popped the bag of riced cauliflower in the microwave for 5 minutes. In the meantime, I started by scrambling 2 eggs in a large nonstick skillet.

Next, I removed the cooked eggs to a plate.

Note, there’s no need to clean or wipe out the egg residue from the pan, just add a bit more oil and throw in the cabbage and carrots (or any vegetables that need a bit longer to cook).

Next add the cooked riced cauliflower. After microwaving, it could have excess moisture that you want to eliminate.

After a few minutes, add the peas and green onions, and just cook until heated through.

Finally, add the scrambled eggs back to the pan, along with the Tamari, sesame oil and hot sauce, and mix thoroughly. Of course, the hot sauce is optional. Be sure to taste it once everything is combined. You may want to add more salt or other seasonings.

I know that this recipe has a few steps and involves chopping up several vegetables, but it really comes together quickly, in only 15-20 minutes. You will be happy that you took the time to make it. It can be served for breakfast, as a side dish with other Asian stir-fry components, such as beef, pork, chicken or fish, or you can add the meat directly to the fried rice and serve it as the main course.

Asian Fried (Cauliflower) Rice

Servings:  4

  • 1 (10-ounce) package frozen riced cauliflower
  • 2 tablespoons avocado oil (or olive oil), divided
  • 2 eggs, organic and free range
  • 1 cup chopped green cabbage
  • 1/2 cup slivered carrots
  • 1/2 cup frozen green peas
  • 1/2 cup finely chopped green onions
  • 2 tablespoons Tamari soy sauce, low sodium
  • 2 teaspoons toasted sesame oil
  • 1 teaspoon Sriracha hot pepper sauce
  • Salt and pepper, to taste

Directions:

Cook the riced cauliflower in the microwave for 5 minutes.  Set aside.

Heat a large skillet over medium high heat, add 1 tablespoon of the oil and quickly scramble the eggs with a pinch of salt.  Remove the eggs to a plate.

Add the remaining oil to the same pan, and saute the cabbage and carrots for about 5 minutes, until crisp-tender and starting to brown.

Add the cooked riced cauliflower to the pan and saute for a few minutes, to allow any excess moisture to evaporate.  Add the peas and green onions and cook for 1-2 more minutes. 

Add the scrambled eggs, Tamari, sesame oil and Sriracha, and stir to combine thoroughly.  Taste to adjust seasonings and serve.

Variations:  Add chopped beef, pork, chicken or shrimp.  Add different vegetables such as broccoli, spinach, or peppers.  Add some fresh ginger or garlic.

Super Simple Slaw

I make coleslaw at least once a week. It’s super quick and easy if you buy the pre-shredded cabbage mix, or even in you buy a whole cabbage and slice it yourself. It only takes 5 minutes to throw together.

I like the basic recipe with a mayo-based dressing, but sometimes I will make one with vinegar and oil, kind of a sweet and sour version.

I start by chopping some scallions. Then I just mix the mayonnaise, vinegar, salt and stevia in a large bowl, and add the bag of coleslaw and onions.

That’s all there is to it! Some people say that it’s best to chill the salad for an hour for the flavors to blend, but I often serve it immediately and it’s just fine.

This goes great with burgers, sandwiches, crab cakes, fish, pretty much anything. Enjoy!

Super Simple Slaw

Servings:  4 (1 cup each)

  • 1/4 cup mayonnaise
  • 2 tablespoons apple cider vinegar
  • 1 teaspoon granulated stevia (such as Truvia)
  • 1/2 teaspoon sea salt
  • 2 scallions (green parts only), finely sliced
  • 1 (14-ounce) bag coleslaw mix, (or a half head of raw cabbage, finely sliced)

Directions:

Add the first 4 ingredients to a large bowl and stir with a whisk to combine thoroughly.  Add the onions and coleslaw and toss.  Refrigerate until ready to serve.

Variations:  Use extra virgin olive oil or avocado oil instead of mayonnaise.

Grain-Free Tabouli Salad

I have always loved Middle-Eastern foods, such as falafel, hummus, baba-ghanouj and tabouli salad. But then I started cutting back on starchy grains and beans, so I stopped having many of these foods.

One day when I was making a recipe using riced cauliflower, it occurred to me that it would make a great substitute for the bulgur wheat used in tabouli.

First I cooked the riced cauliflower. It only took about 5 minutes in the microwave.

Once it was cool, I added all of the other ingredients. The key is plenty of fresh parsley, along with fresh lemon juice and olive oil. Add cucumbers, tomatoes and scallions, and any other vegetables that you like.

Then put it in the refrigerator for an hour to allow the flavors to develop.

It’s a delicious, refreshing and healthy salad to serve anytime.

Grain-Free Tabouli Salad

Servings:  4

  • 1 12-ounce bag frozen riced cauliflower
  • 1 large tomato, finely chopped
  • 1/2 large cucumber, peeled and diced
  • 1 bunch fresh parsley, minced
  • 3 scallions, finely chopped
  • Freshly squeezed lemon juice, (approx. 1 lemon)
  • 1/4 cup extra virgin olive oil
  • 1/2 teaspoon sea salt, or to taste
  • Black pepper, to taste

Directions:

Cook the cauliflower according to the package directions.  Cool and drain any excess liquid.

Add all of the remaining ingredients and mix thoroughly.  Chill in the refrigerator for at least 1 hour before serving.

Roasted Green Beans

One of my favorite ways to prepare vegetables is to roast them. It doesn’t take very long, only about 15 minutes after the oven is preheated, and you don’t have to wash any pans if you use parchment paper.

The best reason is the intense flavor that roasting provides. The beans remain slightly crisp, but become lightly charred in spots, creating a delicious, caramelized, salty and spicy treat.

All you need to add is a bit of olive oil, salt and LOTS of freshly ground black pepper. The pepper is the key to giving them that spicy kick. It’s so simple, you can pop them in the oven while you prepare other foods.

You can roast pretty much any vegetables: broccoli, cauliflower, zucchini, onions, eggplant, mushrooms, peppers, tomatoes, etc. Experiment with your favorites and hopefully you and your family will end up eating more vegetables, which is always a good thing.

Roasted Green Beans

Servings: 4

  • 1 pound fresh green beans, trimmed
  • 2 tablespoons extra virgin olive oil
  • 1/4 teaspoon sea salt
  • 1/4 to 1/2 teaspoon freshly ground black pepper

Directions:

Preheat the oven to 425 degrees.

Add parchment paper to a large sheet pan, and toss the green beans with the oil, salt and pepper, spreading them evenly over the pan.

Roast for 10 minutes, and stir the beans to prevent browning too much on one side. Continue roasting for another 5 minutes. Remove from the oven, stir and let cool for a couple of minutes. Taste to adjust seasonings.

Roasted Sweet Potatoes

Sweet potatoes are high in fiber, vitamin C, potassium, B vitamins, manganese, magnesium and copper. They get their orange color from beta-carotene, an antioxidant. Not only are they nutritious, but they are delicious!

My favorite way to cook them is to simply slice and roast them in the oven for about 15 minutes. They cook much faster than white potatoes.

My husband doesn’t care for sweet potatoes (which means more for me!), but I will make some white potatoes for him at the same time, and it doesn’t require much more effort.

Feel free to add any other spices to your potatoes. In this case, I just used salt, pepper and rosemary, but you could add thyme, oregano, basil, or even cinnamon.

Roasted Sweet Potatoes

Servings:  4

  • 2 medium sweet potatoes, peeled and sliced into 1-inch rounds
  • 2 tablespoons extra virgin olive oil
  • 1/4 teaspoon sea salt
  • 1/4 teaspoon black pepper
  • 1/4 teaspoon dried rosemary

Directions:

Preheat the oven to 425 degrees.

Add parchment paper to a large sheet pan and add the potatoes in a single layer, not overlapping.  Mix the oil and spices in a small bowl and brush it evenly on top of the potatoes.  Turn them over and brush the oil on the other side.

Roast for 10 minutes, and using tongs or a spatula, turn the potatoes over.  Continue roasting for another 5 minutes, or until tender.  Remove from the oven, and let cool for a couple of minutes.  Taste to adjust seasonings.