Immune Booster Green Juice

As winter approaches, along with cold and flu season, you may want boost your immune system with a healthy green drink. This one is refreshing, slightly sweet and sour, but balanced.

I know that when I start to feel a dry, scratchy throat, sneezing or a stuffy nose, I immediately take extra vitamins to ward off a possible virus. This drink provides essential vitamins, minerals and fiber to help keep your system running smoothly.

I find that using a high-powered blender (like the NutriBullet) is essential when making this kind of drink. Otherwise, you just end up with juice and lose all the fiber.

Here’s everything that I included in my drink (except the lime is not shown in this photo). Below I’ve listed a few of the health benefits of each ingredient.

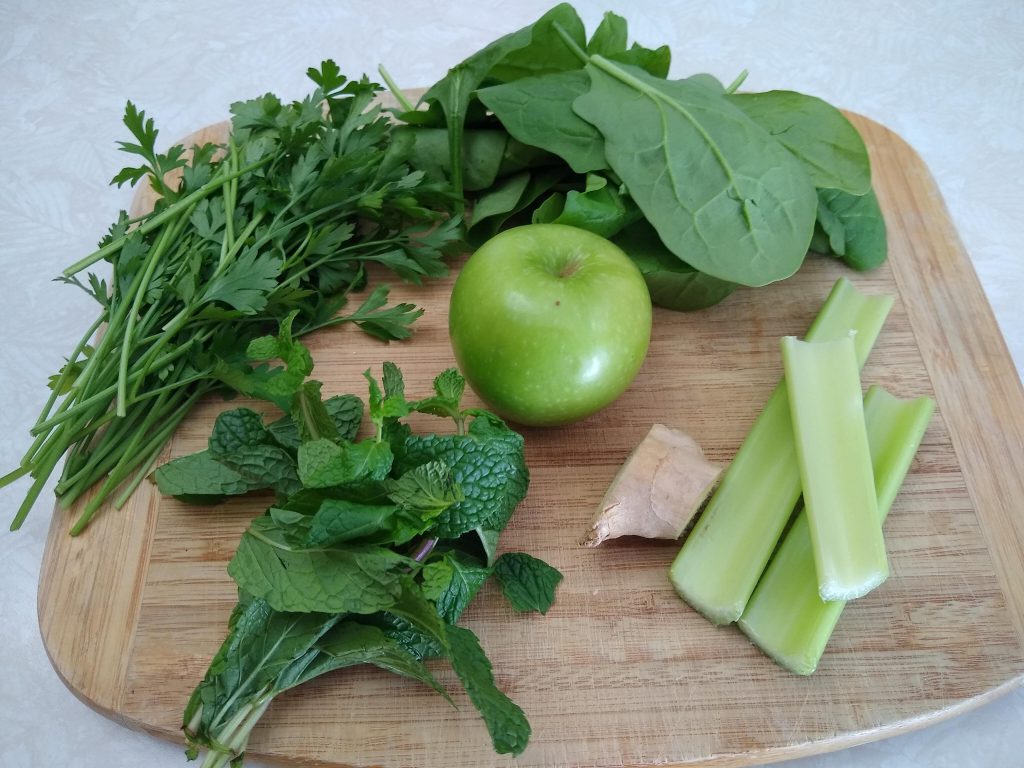
Spinach is an excellent source of vitamin K, vitamin A, vitamin C and folate as well as being a good source of manganese, magnesium, iron and vitamin B2. Vitamin K is also important for maintaining bone health.

Parsley can reduce cancer risk, reduce inflammation, protect blood vessels and boost your immune system.

Mint is a calming and soothing herb that has been used for thousands of years to aid with upset stomach or indigestion. Mint is thought to increase bile secretion and encourage bile flow, which helps to speed and ease digestion (and which may also support healthy cholesterol levels).

Ginger can aid in digestion, provide cold and flu relief, pain reduction, reduce inflammation and promote cardiovascular health.

Granny Smith apples can help combat against chronic inflammation, which can lead to diabetes, and are an excellent source of fiber and vitamin C.

Celery is rich in vitamins and minerals with a low glycemic index. It contains vitamins A, K, and C, plus minerals like potassium and folate; it’s also low in sodium.

Lemons and limes are high in vitamin C, an important antioxidant that helps protect cells from damage. Vitamin C also helps the body absorb iron from foods and supports the immune system.

To make the drink, wash the greens, then stuff them into the NutriBullet container. Add roughly chopped celery, peeled ginger, and (unpeeled) apple, as well as the juice from half of a lemon or lime, and a small amount of water.

Note that once everything is blended, it will be very thick. Feel free to thin it with more water, but I find that it helps to stir it a couple of times while drinking to keep it mixed properly. (The fibrous elements tend to rise to the top.)

Immune Booster Green Juice

Servings:  1

  • 1 handful fresh organic spinach leaves
  • 1 handful fresh parsley
  • 1 handful fresh mint leaves
  • 1 inch chunk of fresh ginger root, peeled
  • 1 small granny smith apple, cored
  • 1-2 stalks celery, roughly chopped
  • The juice from half of a lemon or lime
  • 1/2 cup water

Directions:

Place all of the ingredients in a high-powered blender, such as NutriBullet.  Blend until everything is liquefied, adding additional water, if necessary, to achieve the desired consistency.

Shrimp Tacos with Lime-Cilantro Crema

I make this recipe quite often, using either shrimp or fish. It’s a great option when you’re short on time because it comes together so quickly. The most time-consuming part is peeling the shrimp! I adapted the recipe from one for fish tacos posted in 2006 by Cooking Light.

Start by making the Lime-Cilantro Crema. Just stir together equal amounts of mayonnaise and sour cream, a bit of fresh lime juice, garlic, salt, along with chopped cilantro and scallions.

Then, peel and devein one pound of shrimp. Note that you can use any firm fish in place of the shrimp. I prefer this recipe because it doesn’t require breading and deep frying the fish or shrimp, so it’s much healthier.

Next, toss with some oil and the spices: cumin, coriander, smoked paprika, cayenne pepper, granulated garlic and salt.

Heat a skillet and cook the shrimp over medium-high heat. They only take a few minutes to cook.

You can serve the shrimp in the traditional way, on corn or flour tortillas with some crema and cabbage. (My husband prefers flour tortillas.) Or you can have them the way I did, over mixed greens with a drizzle of crema. Believe me, the salad was rich and satisfying, with the cool greens and warm, spicy shrimp, paired with the tangy sauce. I added a few slices of avocado, too, so I really didn’t miss having any tortillas. Squeeze a bit more fresh lime juice over the top before serving.

Try it and let me know what you think.

Shrimp Tacos with Lime-Cilantro Crema

Servings:  2-3

Crema

  • 1/4 cup finely sliced green onions
  • 1/4 cup finely chopped cilantro
  • 3 tablespoons mayonnaise
  • 3 tablespoons sour cream
  • 1 clove garlic, minced
  • 1 1/2 teaspoons fresh lime juice
  • 1/4 teaspoon salt

Tacos

  • 1 pound raw shrimp, peeled and deveined
  • 1 tablespoon avocado oil
  • 1 teaspoon ground cumin
  • 1 teaspoon ground coriander
  • 1/2 teaspoon smoked paprika
  • 1/4 teaspoon salt
  • 1/4 teaspoon granulated garlic
  • 1/4 teaspoon cayenne pepper
  • Corn or flour tortillas, optional
  • Shredded cabbage
  • Lettuce leaves or mixed greens

Directions:

Place the crema ingredients in a small bowl and stir to combine.

Place the shrimp in a medium bowl, add the oil and spices and toss to evenly coat the shrimp with the spices.

Heat a frying pan over medium-high and add the shrimp.  Stir frequently for 2-3 minutes until the shrimp is cooked.  Remove from the heat.

Serve the shrimp with some crema and shredded cabbage on tortillas, wrapped in lettuce leaves or over mixed greens. 

Instant Pot Cream of Chicken Soup

Here is another delicious, healthy soup recipe that I adapted from Food Network Kitchen. I wanted to make it in my pressure cooker, because it’s so easy and tastes like it’s been simmering for hours. And I reduced the amount of butter and flour called for in the original recipe. Your family will love it!

Start by using the Saute function, add some butter, along with chopped onions, carrots and celery, and a bit of salt.

As the vegetables soften, add 2 tablespoons of flour, then turn off the Saute function, as the vegetables will continue to cook.

Gather some sprigs of fresh parsley, thyme and dried bay leaves and tie them together with kitchen twine. This is a great trick to make it easy to remove them later.

Another time-saving step is to use a rotisserie chicken from the grocery store, and shred or chop the meat.

Add the chicken to the pot, along with 7 cups of broth and the bundle of herbs.

Now close the lid and set the Soup function for 7 minutes. Note that with the amount of liquid in the pot, it will take several minutes to come up to pressure, before actually starting to cook. This may be a complaint that some people have when using the Instant Pot (that’s it’s not exactly instant), but it would be the same if you were waiting for the soup to start simmering on the stove. The difference is that with the pressure cooker, the finished soup tastes like it simmered for hours, when in fact it was only 7 minutes. And you can walk away or do other tasks while it’s cooking, instead of checking a pot on the stove to see when it might be boiling, then adjusting the temperature and waiting an hour for the flavors to develop.

When the timer beeps, let the pressure release naturally for at least 10-15 minutes, before manually releasing the pressure with the handle of a wooden spoon. (You can drape a kitchen towel over the pot so the steam or liquid doesn’t spray out too far.)

After removing the lid, take out the bundle of herbs and discard. Turn the Saute function back on, add the cream, and some arrowroot (cornstarch) mixed with water to thicken. It only takes a minute or two. Finally, turn off the heat and add the sherry, which really enhances the flavor of the soup.

Taste and add salt and pepper, if necessary.

Instant Pot Cream of Chicken Soup

Servings:  6

  • 2 tablespoons organic butter
  • 1 onion, diced
  • 3 carrots, peeled and sliced
  • 2 celery stalks, sliced
  • 1/4 teaspoon sea salt
  • 2 tablespoons flour
  • 7 cups low sodium chicken or vegetable broth
  • 3 cups cooked shredded chicken
  • 3 sprigs fresh parsley
  • 3 sprigs fresh thyme
  • 1 large bay leaf, or 2-3 small
  • 1/2 cup organic heavy cream
  • 1/4 cup arrowroot (or cornstarch)
  • 1/4 cup cold water
  • 2 teaspoons dry sherry
  • Salt and pepper, to taste
  • Parsley for garnish, minced

Directions:

Turn on the saute function of the Instant Pot.  Add butter and cook the onions, carrots and celery with the salt until tender.  Stir in the flour and cook for a minute.

Add the broth and chicken to the pot.  Tie the parsley, thyme and bay leaf together with kitchen twine and add to the pot.

Close the lid and lock into place, being sure that the valve is in the sealed position.  Press the button for Soup, and adjust the cook time to 7 minutes, then press Start.

When the time is up, let the pressure release naturally for as long as you prefer, (at least 10 minutes) before venting the steam.

Add the cream to the pot, then turn on the saute function and bring the soup to a simmer.  Stir together the arrowroot starch and cold water in a small container, then add to the pot.  Stir frequently until the soup thickens, then turn off the heat. Add the sherry, then taste to see if additional salt or pepper is needed.  Stir to combine and serve with a sprinkle of fresh parsley.

Instant Pot Healthy Cream of Mushroom Soup

I’m been making a lot of soup lately. It’s getting colder outside, which makes me crave warm, comforting soups and beverages. Soup is also very nutritious, depending what you add to it, and fills you up. Plus, I’m enjoying using my new pressure cooker!

I recently read about a new diet plan, called The Plant Paradox. It argues that lectins (a form of protein found in certain plant foods), can cause inflammation and be harmful to the body. The doctor had a convincing argument, so I purchased The Plant Paradox Cookbook, to check it out myself. I have enjoyed many of the recipes. Note that some of them are time consuming to prepare, but are delicious and worth the effort!

One of the recipes I’d like to share with you is the Cream of Mushroom Soup. It’s full of healthy vegetables, such as mushrooms, cauliflower, onions and celery. The cauliflower is the “secret” ingredient that gives it such a hearty, thick and creamy consistency, without the addition of any flour or other thickeners.

So I wanted to try making the soup in my pressure cooker. I started by using the saute function and added the oil, then the mushrooms. I cooked them for several minutes until they became soft and slightly browned. Note that the recipe instructs to remove half of the mushrooms and set them aside to add back to soup later, but I prefer to leave all the mushrooms in the pot to puree into a smooth soup when finished, rather than having some in chunks.

At this point, I added the onions, garlic and celery. When they started to soften, I added a whole large cauliflower, roughly chopped into florets. Then I added salt, pepper, onion powder, Dijon mustard and 4 cups of chicken broth.

I closed the lid and set it to cook at pressure for 7 minutes. I let the pressure release naturally for at least 10-15 minutes before releasing it and opening the lid. Here is the result.

Next, I used my convenient hand blender to puree the soup completely.
(Note that you could also transfer the soup to a traditional blender and do it that way.)

Here is the soup after pureeing. See how thick and rich it looks?

Next, the recipe calls for adding 1 cup of coconut cream, but I prefer to use organic heavy cream. I know that using cream sounds decadent, but the amount per serving is not actually that much, compared to all the nutritious vegetables you are getting. If you prefer, you can reduce the amount of cream.

If you set aside half of the cooked mushrooms earlier, add them back to the soup. Ladle the soup into bowls and garnish with fresh parsley.

Instant Pot Healthy Cream of Mushroom Soup

Servings:  8

  • 3 tablespoons extra-virgin olive oil
  • 2 pounds mushrooms, sliced
  • 1 teaspoon fresh thyme
  • Zest of 1 lemon
  • 1 onion, diced
  • 2 cloves garlic, minced
  • 2 celery stalks, sliced
  • 1 large head cauliflower, coarsely chopped
  • 1 1/2 teaspoons sea salt
  • 1/2 teaspoon black pepper
  • 1/2 teaspoon onion powder
  • 1 teaspoon Dijon mustard
  • 4 cups low sodium chicken or vegetable broth
  • 1 cup organic heavy cream, or canned coconut cream
  • Parsley for garnish, minced

Directions:

Turn on the saute function of the Instant Pot.  Add 2 tablespoons of the olive oil and cook the mushrooms until golden brown and tender, then add the thyme and cook for an additional 2 minutes, until very fragrant.

If you prefer your soup a bit chunky, you can remove half the mushrooms from the pot and set aside for later.  Add the remaining olive oil, along with the onion, garlic, and celery, and cook until onion and celery are tender.

Add the cauliflower to the pot, along with the salt, pepper, onion powder, and mustard.  Sauté until fragrant, then add the broth.  

Close the lid and lock into place, being sure that the valve is in the sealed position.  Press the button for Soup, and adjust the cook time to 7 minutes, then press Start.

When the time is up, let the pressure release naturally for as long as you prefer, (at least 10 minutes) before venting the steam.  If you have more time, feel free to let the pressure release completely, keeping the soup on Warm until ready to serve.

Use a hand blender to puree the soup (or transfer to a blender).   When the soup is smooth, add the reserved mushrooms if you set them aside, and pour in the cream.  Stir to combine and serve with a sprinkle of fresh parsley.

Instant Pot Stuffed Cabbage Rolls (Galumpki) Casserole

Galumpki is the Polish name of a dish popular in cuisines of Central Europe, made from boiled cabbage leaves wrapped around a filling of minced pork or beef, chopped onions, and rice or barley.

I have enjoyed cabbage rolls at many family gatherings.  Not quite as popular as pierogi and paczki, they are still delicious, but time consuming to prepare.  I decided to experiment with my new pressure cooker, and make a casserole that had the flavors of stuffed cabbage without all the work.

I apologize for the lack of pictures showing the preparation, but I hadn’t decided if I would include this recipe on my blog, in case it was a disaster.  Once we tasted it and determined that it was good, I took a photo and decided to share it with everyone.

I used ground turkey instead of beef or pork, along with some onion, cabbage and canned tomatoes.  In many recipes I substitute riced cauliflower for regular rice, but this time I decided to use rice to make it a bit more traditional.  With all of the vegetables, meat, and only one cup of rice, the portion of rice is very small. But you can feel free to use riced cauliflower if you prefer.

It takes a bit of time to chop the cabbage, and saute the meat and vegetables, but the cook time is only 15 minutes, (plus the time to bring the mixture up to pressure).  It will be finished before you can even boil cabbage leaves to make it the old fashioned way!

My husband really enjoyed this dish, much more so than regular cabbage rolls.  Try it!

Instant Pot Stuffed Cabbage Rolls (Galumpki) Casserole

Servings:  6-8

  • 1 tablespoon avocado oil (or olive oil)
  • 1 pound ground turkey, preferably organic
  • 1 medium yellow onion, peeled and diced
  • 1/2 large head of green cabbage, chopped
  • 1 cup basmati rice
  • 1 (14.5 ounce) can crushed tomatoes
  • 2 cups low sodium chicken broth
  • 1 tablespoon tomato paste
  • 1 tablespoon stevia brown sugar blend, such as Truvia
  • 1 tablespoon fresh dill weed, minced
  • 1 teaspoon paprika
  • 1 teaspoon sea salt, or to taste
  • 1/2 teaspoon black pepper
  • 1/2 cup scallions, finely chopped

Directions:

Turn on the saute function of the Instant Pot.  Add the oil and the ground turkey, and cook for a few minutes until slightly browned, breaking up the meat into small pieces.

Add the onions and cabbage, and cook for a few more minutes until softened.

Add the remaining ingredients, except scallions, and stir to combine.

Turn off the saute setting, close the lid and lock into place, being sure that the valve is in the sealed position.  Press the button for Manual, and adjust the cook time to 5 minutes, then press Start.

When the time is up, let the pressure release naturally for 10 minutes before venting the steam.   Stir, and taste to adjust seasonings.  If the mixture is too thick, add more broth.

Sprinkle with the scallions and serve.

Variation:  To make the recipe lower in carbs, substitute riced cauliflower for the basmati rice, and decrease the chicken broth to 1 cup.

Instant Pot Cabbage Soup with Ground Turkey

I’m so excited that I finally received a pressure cooker as a gift from my sister! I have been reading about all the benefits, and I know that so many people love using them, but I was resistant. I figured that I already had a slow cooker, and that a new gadget would just take up more space.

But I have to admit that I am sold! I am a big believer in efficiency, and having the ability to saute or brown meat all in one pot before pressure cooking really helps. Who wants to wash multiple pots and pans?

Plus, it’s so great to have homemade soup ready in only half an hour! It’s just as good as if you had simmered it all day.

Since it’s officially Fall, I’m trying to make a different soup each week. It’s a great way to eat more vegetables, plus it’s a hearty and comforting meal on a cool day.

The most time consuming part is chopping a few vegetables. I used one onion, two carrots and two stalks of celery.

Then I turned on the saute function of the pot, added some oil, and started browning the ground turkey. I added a bit of salt and pepper to flavor the meat.

Once the meat was starting to brown, I added the onions, carrots and celery to soften.

Once the vegetables were cooking, I roughly chopped half of a large head of cabbage. It doesn’t have to be perfect; it will cook down to a soft consistency.

Then I added the cabbage, some dried ground sage, and 8 cups of chicken broth. The sage really gives the soup a nice flavor, reminiscent of foods you might make on Thanksgiving. Feel free to add whatever seasonings you prefer, such as garlic, thyme or basil.

I turned off the saute function, sealed the lid, set the release valve to “sealing” and selected the Soup function. I changed the cook time to 7 minutes and hit Start.

When the machine beeped after the time was up, I let the pressure release naturally for 10 more minutes, then I used the handle of a wooden spoon to turn the valve to “venting.” After all the steam was released, I opened the lid (be sure to wear an oven mitt!).

There you have it! Delicious homemade soup in only a few minutes.

Instant Pot Cabbage Soup with Ground Turkey

Servings:  8

  • 1 tablespoon avocado oil (or olive oil)
  • 1 pound ground turkey, preferably organic
  • 1/2 teaspoon sea salt
  • 1/4 teaspoon black pepper
  • 1 medium yellow onion, peeled and diced
  • 2 large carrots, peeled and diced
  • 2 large celery stalks, diced
  • 1/2 large head of green cabbage, chopped
  • 1/2 teaspoon ground sage
  • 2 quarts (8 cups) low sodium chicken broth

Directions:

Turn on the saute function of the Instant Pot.  Add the oil and the ground turkey, along with the salt and pepper, and cook for a few minutes until slightly browned, breaking up the meat into small pieces.

Add the carrots, celery and onions and cook for a few more minutes until softened.

Add the cabbage, sage and chicken broth, and stir to combine.

Close the lid and lock into place, being sure that the valve is in the sealed position.  Press the button for Soup, and adjust the cook time to 7 minutes, then press Start.

When the time is up, let the pressure release naturally for 10 minutes before venting the steam.  If you have more time, feel free to let the pressure release completely, keeping the soup on Warm until ready to serve.

Tzaziki (Cucumber Yogurt Dip)

Tzaziki is one of my favorite sauces/dips. I used to order it at a restaurant in Greektown in Chicago (along with saganaki, taramasalata, etc.). It’s a delicious, thick and creamy dip, with minced or grated cucumbers, yogurt, lemon juice, salt and a hint of garlic. I like to add some fresh dill weed, but it’s not necessary.

If you’ve ever had a gyros sandwich, a version of this sauce is drizzled on top.

Tzaziki is so versatile. You can serve it as a dip with celery, carrots and other raw vegetables, or pita bread/chips. I like to serve it alongside grilled chicken kebabs, fish, or a dish I like to make with ground turkey or lamb that has the flavor of gyros. I will share that recipe in the near future.

You start by peeling and seeding a large cucumber, then chopping it very finely. I add a bit of salt and place the cucumbers on some paper towels to drain.

After about 15 minutes, you can pick up the paper towels with the cucumbers inside and squeeze over the sink to release most of the liquid. This prevents your dip from becoming watery. Place the drained cucumbers into a medium bowl.

Next, add the yogurt and garlic.

Squeeze in your lemon juice, add some salt and fresh dill weed. Mix thoroughly. That’s all there is to it! Try some on a crisp stalk of celery.

Tzaziki (Cucumber Yogurt Dip)

Servings:  4-6

  • 1/2 large cucumber, peeled, seeded and minced
  • 1 cup Greek yogurt, preferably organic
  • 1 clove garlic, minced
  • Juice from 1/2 lemon
  • 1 tablespoon fresh dill weed, minced
  • 1/4 teaspoon sea salt

Directions:

Place the minced cucumber on a double layer of paper towels in a medium bowl.  Add a sprinkle of salt and leave at room temperature for 15 minutes.

Wrap the paper towels around the cucumbers and squeeze out as much water as possible.  Place the cucumbers back in the bowl.

Add yogurt, garlic, lemon juice, salt and dill weed and stir to combine.  Taste and add more salt, lemon or dill if desired. 

Optional:  add a drizzle of extra virgin olive oil.

Vegetable Soup with Chicken

This is a hearty soup recipe from my mother-in-law, filled with lots of fresh, healthy vegetables. Though it has some chicken, the vegetables take center stage. I try to use organic vegetables whenever possible, especially celery, and I was also fortunate to get some tomatoes and parsley from a friend’s garden. If you have a farmer’s market nearby, this is a great way to use the wonderful, fresh produce before they close for the season.

First, make a flavorful stock using chicken legs, vegetables and spices. Note that you can use a whole chicken, or you can omit the chicken completely to make it vegetarian, but I’m following my mother-in-law’s instructions.

First, soak the chicken in cold water for 30 minutes.

While the chicken is soaking, take the onion halves, and place them directly on the grate of your gas burner to get them charred slightly. Only 2-3 minutes is all it takes.

After soaking the chicken, drain the water and add 4 quarts of fresh water and bring to a boil. Skim off all the foam that rises to the top, then add the charred onion, celery, carrots and spices, and let simmer for 45 minutes. Try not to let it boil after adding the vegetables, just a very slight simmer.

Once the chicken is cooked, remove it and cool, then take the chicken off the bones and shred the meat. Strain the stock and discard all remaining ingredients.

Then increase the heat slightly, add celery and green beans, and simmer for 10 minutes. Add the potatoes, tomatoes and carrots. I know that I focus on recipes without starchy ingredients like potatoes, but with the huge amount of soup this recipe makes, there is only a very small amount of potatoes in each serving.

Continue cooking until everything is tender. Finally, add the chicken back to the pot. Garnish with fresh parsley and/or dill weed.

Vegetable Soup with Chicken

Servings:  12

Stock

  • 6 organic chicken legs
  • 4 quarts (16 cups) water
  • 1 medium yellow onion, peeled and halved
  • 2 large carrots, peeled and chopped
  • 2 large celery stalks, chopped
  • 3 cloves garlic, peeled
  • 3-4 bay leaves
  • 10 black peppercorns
  • A few sprigs fresh parsley
  • 1 tablespoon chicken base or bouillon
  • 2 teaspoons sea salt

Soup

  • 4-5 celery stalks, sliced
  • A handful of fresh green beans, trimmed and sliced (approximately 2 cups)
  • 4-5 carrots, peeled and sliced
  • 2 tomatoes, diced
  • 1 large, or 2 small potatoes, peeled and diced
  • Fresh parsley and/or dill, minced, for garnish
  • Salt and pepper, to taste

Directions:

In a large soup pot, place chicken legs and cover with cold water.  Let soak for 30 minutes, changing water a couple of times.

Turn on the gas burner, and place the onion halves directly on the burner grate for 2-3 minutes, turning a couple of times to get a nice char.

Drain and add 4 quarts of fresh cold water to the pot with the chicken.  Bring to a boil, and skim off any white foam/fat that rises to the top.  Add the charred onion, carrots, celery and spices.  Simmer over very low heat for 45 minutes, or until chicken is cooked.  Strain the broth and set the chicken aside to cool, then remove the meat and discard the skin and bones.  Discard all remaining stock components.

Add the celery and green beans to the stock, and simmer for 10 minutes.  Add the carrots, tomatoes and potato, and continue cooking until tender, approximately 15-20 minutes.  Add the chicken back to the pot, and taste to adjust seasonings.  Garnish with parsley or dill.

Variations:  Add cooked noodles or beans.  To make a vegetarian version, omit chicken.

Cucumbers in Sour Cream

This recipe was provided by my Polish mother-in-law. Note that her version doesn’t include scallions, but I thought they made a nice garnish.

The salad is delicious…creamy, refreshing and slightly tart, with the main enhancement of fresh dill.

The key to this recipe is to slice the cucumbers very thinly, salt them, and let them stand for a half hour so that the water starts to come out. You don’t want a watery salad! I was lucky enough to have a cucumber from a friend’s garden. It had a lot of large seeds, so I just scooped them out with a spoon before slicing.

Next, after a half hour has passed, place the colander over the sink and take handfuls of cucumbers and squeeze them well, until they expel as much liquid as possible. Place the squeezed cucumbers into a bowl.

Then just add your sour cream, a bit of lemon juice, black pepper and fresh dill weed. You can adjust the seasonings as you like, adding a bit more salt or lemon juice, or a tiny pinch of sugar.

The salad can be served as a side dish with any meats, fish, poultry, or sandwiches.

Cucumbers in Sour Cream

Servings:  2

  • 1 medium cucumber, peeled and seeded
  • Salt, to taste
  • 2 tablespoons organic sour cream
  • 1-2 teaspoons fresh lemon juice
  • 2 teaspoons fresh dill weed, minced
  • Black pepper, to taste
  • 1 tablespoon sliced scallion greens, optional

Directions:

Slice the cucumber very thinly and place in a colander.  Add a generous sprinkle of salt and toss.  Let sit at room temperature for 30 minutes.

With your hands, squeeze out as much water as possible from the cucumbers, and place them in a bowl.

Add sour cream, lemon juice, dill and black pepper and toss to combine.  Taste to see if more salt is needed.  Garnish with scallions.

It’s best to make the salad at least 1 hour ahead so the flavors have time to develop.

Greek Salad with Vinaigrette

Traditional Greek salads, sometimes called Greek Village Salad (or Horiatiki), don’t include lettuce, but I prefer mine with a base of romaine, so that’s the recipe I’m sharing today.

First, you can start by mixing a simple vinaigrette. I found a recipe that I liked in the book, “The New Atkins for a New You.” It includes fresh lemon juice which I think really enhances the dressing, but if you don’t have a lemon handy, then by all means use red wine vinegar.

It’s so easy to make, just a few spices, garlic, olive oil, lemon juice and a splash of vinegar. I added everything to my shaker bottle, and it makes enough for several servings.

For the salad, I was so fortunate to have fresh tomatoes and cucumbers from a friend’s garden. The fresher your ingredients, the tastier your salad is going to be. Along with tomatoes and cucumbers, I add organic romaine lettuce, a bit of red onion, and Greek feta cheese. Feel free to add kalamata olives, as well.

Sometimes red onions can have a very strong flavor, so a little trick to mellow them, is to rinse the onion slices in cold water before adding them to the salad.

Once all the ingredients are in the bowl, drizzle some vinaigrette on top.

To make it a full meal, add some protein like grilled chicken. It tastes so fresh! The crisp lettuce and cucumber, sweet tomatoes and salty feta, plus the lemony tang of the vinaigrette, make a great combination. It’s like the best of summer in a bowl!

Greek Salad with Vinaigrette

Servings:  1 entrée or 2 side salads

  • 3 generous handfuls of torn romaine lettuce (approx. 3 cups)
  • 1/2 cup diced cucumbers
  • 1/2 cup diced tomatoes
  • 2 thin slices of red onion
  • 2 tablespoons Greek Vinaigrette (recipe below)
  • 2 tablespoons crumbled Greek feta cheese
  • A few Kalamata olives, optional
  • 1-2 pepperoncini, optional

Greek Vinaigrette

Servings:  4

  • 6 tablespoons extra virgin olive oil
  • 1 garlic clove, minced
  • 1/2 teaspoon dried oregano
  • 1/2 teaspoon salt
  • 1/4 teaspoon pepper
  • 2 tablespoons fresh lemon juice
  • 1 teaspoon red wine vinegar

Directions:

Add lettuce to a large bowl, along with cucumbers, tomatoes, onion and feta.   

Combine vinaigrette ingredients in a shaker bottle and shake to combine, or whisk in a bowl.

Drizzle salad with 2 tablespoons of dressing. 

Add some grilled chicken or other protein to make a full meal.